Thursday, July 26, 2012

Creating an External Object for the iOS generator

As Gaston explained in a previous post, one of the mechanisms for extending the model, is the use of External Objects. By creating an External Object you can provide functionality that is not provided by default by GeneXus.

The problem to be solved

Recently I needed for a project to interact with the actions of a panel, in a way that is not the default. There were basically to possibilities: to hack the solution into the GeneXus libraries, or to create an External Object to provide the functionality. We decided to use the later.

What I needed, was to be able to display the low-priority actions in a panel where the navigation bar is hidden.

Some background here. When you create a Smart Device Panel in GeneXus, you can define actions, which have a priority: High, Normal or Low. The low-priority actions are displayed in an action sheet, that is presented from a button in the navigation bar.

The problem was that the navigation bar was hidden, so the user didn't even see the button to show the action sheet.

Creating a new External Object

The implementation of an External Object consists on three parts:
  1. The implementation of the functionality, in Xcode
  2. The GeneXus object that defines the External Object's API
  3. The mapper, that translates the name of the GeneXus object to the Objective-C class.
Defining the methods in GeneXus

Lets start by creating the definition. To do that, in your GeneXus KB, create a new object of type "External Object" and give it a name. In this case, the object is called EOActions.

After that, you need to define the methods of the External Object. In this case, it has only one method named "ShowLowPriorityActions" that doesn't receive any parameters and has no return value.

Important: every method must be declared as "static" in the method properties.

Implementing the External Object

The implementation is of course in Xcode, since we need to create a library.

So, open Xcode and create a new library project.

Add a reference to the GXFlexibleClient.framework.

The main class implementing the External Object must subclass GXActionExternalObjectHandler (you'll need to add an '#import <GXFlexibleClient/GXFlexibleClient.h>' ), and it must provide two methods:
  • + (BOOL)canHandleAction:(id <GXActionExternalObjectDescriptor>)actionDesc
  • - (void)actionExecuteWithContext:(id<GXActionHandlerContext>)context delegate:(id<GXActionHandlerDelegate>)delegate
In the second one, don't forget to call [super actionExecuteWithContext:context delegate:delegate];

After that, you need to provide your custom implementation, and once you are done, you must call either one of:
  • [self onFinishedExecutingWithSuccess];
  • [self onFinishedExecutingWithError:error];
depending on the result, so the actions that are after the External Object call, can get executed.

After you compile the library, you need to copy it to the GeneXus KB. It must be placed in
  • <model_dir>\mobile\iOS\<main_obj_name>\iOS\Genexus\UserControls
so it gets copied when compiling and liked against.

Mapping the External Object name to the implementation class

The last piece, is the source file to provide the mapping between the GeneXus' object name and the class implementing it.

The class must be named GXCustomExternalObjectsMapper, and has only one method:
  • - (NSString *)externalObjectClassNameForObjectName:(NSString *)objName;
that receives the name of the object and returns the name of the class.

This sources (GXCustomExternalObjectsMapper.h and GXCustomExternalObjectsMapper.m) should be placed in
  • <model_dir>\mobile\iOS\<main_obj_name>\iOS\Genexus\Classes
Example implementation

I know this may be a little intimidating at first, but once you've done an External Object, you'll see it is not too difficult. It involves only this three steps as described above.

I've uploaded the XCode project, the GeneXus External Object export (as a .xpz file) and the mapper class to a GitHub repository, so you can play with the code.

Thursday, June 7, 2012

Designing on the mobile era


We are once again facing a design challenge: creating applications for new platforms we are not fully familiar with yet. This is the same situation we experienced when we jumped from a text-based UI to a Windows UI, or from Windows to the Web. The new platform is, in this case, “smart devices” (phones and tablets).

From Unconsciously incompetent to Consciously incompetent

The main point we need to realize is that we need to move outside our comfort zone and accept we are, most likely, “unconsciously incompetent” in terms of Mobile design. Even if you are a Web design expert! But don’t feel bad about it, because almost everybody is.

Things we must know to move to a “consciously incompetent” state:

  • Web Design is not Smart Devices Design
  • In most cases “One Design Doesn't Fit All” (form factors, sizes, densities, orientations, modes, etc). You could try adaptive layouts but that won’t be enough in many cases.
  • Platform Guidelines matter
    • Win8 != Android != iOS
  • UX Patterns are key on mobile design

From Consciously incompetent to Consciously competent


I'll write some essential point to move to a consciously competent state.

The basics:

Some more specific ones, but basics anyway:
  • Data Entry
Users are not too keen on custom data entry controls, so try to use the standard ones. By the way, avoid data entry if you can ;)
  • The main input today is touch. Controls on the screen should not only be touchable, but also have minimum dimensions for making it comfortable. See Touch Interaction Guidelines
  • When designing layouts for iOs (it almost applies to Android too) consider using the 4px pattern
  • Do not put many tabs on screen, remember that more is less.
  • For grids, consider using the “empty dataset pattern”.
  • Multiple layouts should be considered, normally one by size (small, medium, big).
  • Avoid using the virtual keyboard whenever possible.
  • The color scheme must be the same throughout the application.
  • Windows 8 apps must use a “chrome-less” design, so no action buttons on layouts.
  • For Android and iOS, consider using the application bar whenever possible; do not create your own way to handle actions.
  • Read about patterns that already work in many applications:

And the last and most important thing: create your first application in each platform, it is the best way to become competent.

From Consciously competent to Unconsciously competent

We could reach this status as we do in any other activity: by exercising a lot! We simply need to create a lot of applications until the best practices become second nature to us.

By the way, if you find some useful sources for learning more about design, please drop me an e-mail or just comment on this post.

@gmilano

Saturday, May 26, 2012

GeneXus vs PhoneGap vs Titanium

In http://developer.appcelerator.com/blog/2012/05/comparing-titanium-and-phonegap.html there is an excellent comparison between two good products used to develop mobile applications: PhoneGap and Titanium.
Since we released GeneXus X Evolution 2 with the ability to generate Smart Device apps, both developers and companies are asking us how we stack up when compared with these two. There is much to say about this topic, so in this article I will cover just the most important aspects of the comparison.

Let’s start with the basics:

What is each product trying to achieve? 

PhoneGap: Development of HTML-based web applications, while installing them as if they were native applications.
Titanium: A cross-platform JavaScript runtime and API for mobile development.
GeneXus: Model Driven Development to create cross-platform Smart Devices applications.

GeneXus is a lot more that a “mobile application generator”. To start with, an application created by GeneXus is a “true” native code application: Objective-C for iOS, and Java for Android and BlackBerry.

In addition, mobile applications need more than the UI. In general they are “connected” applications, and therefore need a server back-end. For this reason GeneXus also creates the database and service layers (derived from the same model) that expose the business logic to the mobile application. The database can be Oracle, SQLServer, MySQL, Informix or DB2, and the business logic may be generated in .NET, Ruby or Java.

This means that, for GeneXus, the concept of application is very different than for the other products. “Application”, in GeneXus, involves the ENTIRE application, from the data layer to the client presentation layer. As a plus, GeneXus can be used to generate the “web portion” of an application too.

Philosophical Differences


The development philosophy of GeneXus has been historically different from “mainstream” development. In fact, the concepts closer to our core philosophy are those around Model Driven Development (MDD). We do not believe HTML, Javascript, Java, Objective-C, .NET (Mono) or any other particular technology should be the centerpiece around which developers build their software.

For GeneXus, languages are just an assembler to obtain final applications, simply a tool to obtain the objective, and (most importantly) an interim tool that will change over time. Based on this, it is not important for us if tomorrow’s applications are programmed (say) using a functional language, or a paradigm completely opposite to the current one. Languages are merely a way to reach the goal. Never-ending discussions like “native vs. web applications” are not relevant. What is really important is the model representing your application.

It is for this reason that, in GeneXus, our intention is to provide a way to declare the application, and not to actually code it. For instance, you can declare that you want:

A List/Detail interface over an entity, and that will result in two, three, or more forms, depending on the entity being displayed.

To show a list of entities, and then choosing whether to display them in a simple grid, a map, a magazine viewer, or chart.

Authentication, via Facebook or Twitter.
Declaring in a model allows for an abstraction level infinitely superior to coding in Javascript or any other third-generation level language.

Weaknesses of the GeneXus Approach


If you're used to “coding everything”, then MDD can feel quite rigid. The goal of MDD is to ‘program' on a higher level of abstraction. This means that you have to specify less and generate more. However, this also means that you can't tweak every last detail the way you want.
Since GeneXus is a modeling platform with more than 20 years of development, it provides a flexible and extensible model so that most of those details can be configured. While in the short term our approach can lack some particular features of the target platform, this is solved by a model built to be extensible from the ground-up.

GeneXus Strengths

GeneXus allows developers to separate themselves from the different platform details (as PhoneGap and Titanium do) but that’s not all the value it provides. Unlike them, it also includes abstractions and patterns to develop applications in a way that positions the developer closer to the domain of the application than to the technological details. This way has been proven to be more sustainable over time than coding in a third-generation language.
GeneXus also conceives the application as a whole: Data Layer, Business Layer, Services Layer, Security Layer, UI Layer. The mobile component is one component of the application: an important one for sure, but still only one part.

The core strength of GeneXus is that models last longer than any leading technology, and models are what you build in GeneXus. Applications were once built on iSeries or Windows platforms, and today they might be on mobile or web platforms. The technology changed, but the model behind those applications is still valid.

In regards to Smart Device applications, the model allows designing the application independent from the platforms but not ignorant of them. The same application, generated from the same model, will not look the same in, say, iOS and Android. GeneXus is cognizant of the design patterns for each platform, so you will never see, for example, an application generated with GeneXus for Android that has a “Back” button in the action bar.

The model has also many strengths:

Model extensibility 

GeneXus provides two main extensibility concepts to make the model more flexible:

User Controls

If you want to include in the model a specific UI control (for example, based on any found in http://www.cocoacontrols.com), it can be used in GeneXus by adding a simple wrapper for the control in Objective-C or Java.

External Objects

This refers to extending an API to use native functionality that is not (yet) built-in. For example if you want to interact with NFC, you can develop a wrapper to do the mapping of the API calls, so it can be included and used in the model.

Design is not “one size fits all”

The model allows for elements to vary depending on the platform. A very simple example is that you can, say, add more information to a screen if the device is an iPad, without having to write any specific logic to achieve this.

Grid based design

The Form designer uses a “grid-based” approach, which allows placing “tables” (containers) with relative (percentage) sizes at design time, and they are transformed to pixel values at runtime. As a result, developers don’t have to create multiple screens because of small variations in the form factor, density, or other screen characteristics.

Separation of Concerns

The model also provides an abstraction for all visual design elements called a “Theme”. Everything related to visual design (such as colors, backgrounds, borders, images) is defined in the theme separately from the screen layout, and can be tweaked for each platform without having to create multiple form definitions.

Summary

Although Titanium, PhoneGap and GeneXus all help you create smart devices applications, they are quite different in the way the achieve this. GeneXus creates the whole application (data layer, business logic, web, and mobile) based on a model. GeneXus is a good option in the medium and long term because of its philosophy of software creation: declaring over programming in low-abstraction languages.


Friday, March 9, 2012

Events in Smart Devices objects

In the Smart Devices objects (Panels and WorkWith) you can write events as you would normally do in any GeneXus object. However, due to the differences between platforms, the way events are triggered is not the same as in Win or Web objects.

When you generate a smart device object in GeneXus, it creates the client component that runs on the device, but also some services that run on the server.

The events, programmed in the smart devices object, may be executed in the server or in the client, based on some rules:
  • the Start event runs on the server, the first time the object is shown on screen (in the device)
  • the Refresh event runs on the server, every time there is a refresh triggered on the client (by calling the refresh command or whenever it is called automatically)
  • the Load event runs on the server, and is called immediately after the Refresh event, with the difference that it is used to modify Grid variables.
  • every other user event is executed on the client device.
Regarding user events, even though the event runs on the client device, it may need to send requests to the server. For instance, when you call a procedure, the procedure runs on the server.

Having said so, there are a few tips we can give you.

Tip 1: don't call two procedures in the same event

In some cases, you may want to write the following code:
Event 'SomeUserEvent'
    Composite
        Procedure1(...)
        Procedure2(...)
    EndComposite
EndEvent
This wil perform two server requests, one for each procedure. This is an expensive operation and should be avoided when possible. Instead, write
Event 'SomeUserEvent'
    Procedures1and2(...)
EndEvent
and make Procedures1and2 call Procedure1 and Procedure2. This is better because there will be only one request to the server.

Tip 2: move as many code as you can to the Refresh or Load events

Suppose you need to initialize a certain variable, that will be used in a user event. You may write something like
Event 'SomeUserEvent'
    Composite
        &MyVar = InitalizeVariable()
        DoSomething(&MyVar)
    EndComposite
EndEvent
However, if the initialization doesn't depend on any information from the client device, it is better to make the call in the Refresh or Load event, because it avoids making a new server request. The code may look like this:
Event Refresh
    &MyVar = InitalizeVariable()
EndEvent

Event 'SomeUserEvent'
    DoSomething(&MyVar)
EndEvent
Tip 3: execute device-dependent initialization code in the caller object

The Start and Refresh events are executed in the server, so it is not possible to access device information (geo location, for example) when executing those events.

If you need to have that information available in the Start or Refresh events, you should pass them as parameters to the smart device object.

Thursday, February 23, 2012

Physical Measure User Control

When you need to enter a physical measure into your application (like height, weight, temperature, volume, etc.), you usually need to specify the metric system to use along with the value. You may even need to let the user choose the metric system.

Creating the user interface to solve this problem has some difficulties.

For example, if you need to enter a person's height in meters or feet, you may want to provide a wheel picker with values for {meters, centimeters} or {feet, inches} depending on the user's selected metric system. The problem you will be facing, is that the centimeters can go from 0 to 99, but the inches only from 0 to 11.

That's why we added a new user control, SD PhysicalMeasure, that is currently available in iOS and Android.

To use it, you'll need an attribute or variable with type Char or VarChar, and set the Control Type property to SD PhysicalMeasure in your layout. Right now the only measure supported is lengths in meters or inches, but we'll add support for the others in a future version.

The value must be a JSON object with keys Unit, Value and ConvertedValue, that can be created by applying the ToJSON() method to a SDT with the following structure:


You can also parse the resulting JSON by calling FromJSON().

The ConvertedValue is ignored when the user control reads the value, and is provided when the control saves the value. It is always in the decimal metric system unit for the given measure.

This is how the control looks in runtime


Wednesday, February 15, 2012

Runtime translation in applications

In the latest builds of GeneXus X Evolution 2, runtime translation has been added to the Android and iOS generators.

This means that you can have your application translated to the user's device language automatically, just by providing the translation of the application strings to the supported languages.

To configure how the translation is handled, you can use the same property available to the Web generators: Translation Type (in the Environment settings). The available options are "No translation", "Static" or "Run-time".

Tuesday, January 24, 2012

Push Notification now available in Android Smart Device Generator.

In the GeneXus Smart Devices Generator, Push Notifications have been available for a while for iOS, and are now also available in Android.

Please check this article for an introduction to push notifications in GeneXus Smart Devices.

Android Push Notifications are based on the Android Cloud to Device Messaging (C2DM) technology and are available for all devices running Android 2.2 or higher that also have the Market application installed.

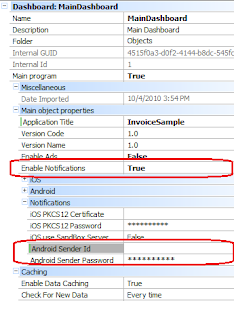
Using them from GeneXus is really simple, and is done by setting to True the “Enable Notifications” property in the Main object properties group. When doing this, a new set of properties is available (under the header “Notifications”):

You need to set the credentials for a GMail user that has been previously registered to use C2DM (see http://code.google.com/android/c2dm/signup.html). A typical user would be yourapp@gmail.com.

From now on, if you execute your GeneXus application in a Smart Device, a service called NotificationRegistrationHandler is executed in order to register the device information needed to send messages (AKA push notifications) to the device in the future. This information must be stored in your application’s database, and an example of a registration procedure is already included in your Knowledge Base. Every new device that uses your application will call this procedure with its own data.

With this information, you can start sending messages to registered devices (those that use your application) using the Call method in the Notification external object:

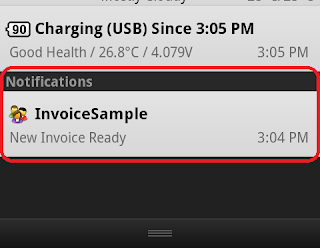
And that’s it. The messages sent will be shown as notifications in the Android device:


Now you are ready to use Push Notifications with Android. Enjoy!

Note: this feature is available in Android starting in build 52654 with C# and Java in the server side (see the night builds log). We will add Ruby option soon.

Friday, January 20, 2012

Share button in Image Gallery

We recently added a new property to the SD Image Gallery user control: Enable Share Action.

This property adds a button to the user interface that lets you select several images, and send them by e-mail.

Note: by now this feature is only available in the iOS generator (starting on build 52470, see the night builds log), but it will be added to Android and BlackBerry soon...

But before using this property, we need to have an image gallery... To do that, simply select the Grid item in the layout that you want to show as an image gallery, and set the Control Type to "SD Image Gallery". You also need to set the property Data Attribute with an image attribute that will be displayed in the user control.


If you want your users to be able to share the images by e-mail, just set the property Enable Share Action to True (default is False).

This is how it looks when you run the application in the iPhone:


The "Share" button is located on the upper right corner of the screen. When you tap it, it changes to "Done", and lets you select one or more images.


When you tap "Done", an e-mail composer window appears with the selected images attached.


That's it: as easy as setting a property in your control :)

If instead of being in the gallery view (where you see several thumbnails) you already selected an image, the "Share" button shows the e-mail composer window with that image attached.


Thursday, January 19, 2012

Welcome

Welcome!

In this blog, we'll be talking about the GeneXus for Smart Devices generator.

About GeneXus

GeneXus is a powerful, multi-platform software design and development tool that enables truly incremental development of business critical applications, generates 100% of the application based on your user requirements, providing programming-free, automatic maintenance of your application’s database and application programs, and supports the leading execution platforms and languages, and the most popular DBMS.

Learn more

About GeneXus X Evolution 2

There is a revolution around Smart Devices. A new kind of devices (phones, tables and other) getting more and more popular. This revolutionizes application development too, since new kinds of applications are running (and can be built) on these smart devices: Native Task (or Activity) Oriented applications and Consumer applications.

Consumers all over the world choose which smart device to buy and use. On the other side each smart devices manufacturer states its own user interface standards and development languages which makes application development for smart devices even more challenging.

GeneXus X Evolution 2 adds technology and a specific generator to target Smart Devices. Supported devices so far are the ones with Android, Blackberry and iOS (iPhone, iPad, iPod Touch).

Learn more